
Do you have lots of Designer Series Paper lying around that you just don’t know what to do with? I can help! I have an easy card layout using Designer Series Paper for a super quick card that is perfect for all levels of stampers – even those of you who are beginner card makers.
This card layout does not require a lot of supplies so it is perfect when you need a quick card. All it requires is your favorite patterned paper, a piece of coordinating colored card stock, and a greeting stamp for the occasion! Any greeting will work with this easy card layout using Designer Series paper, so you can easily make whatever kind of card you need.

So grab your stack of unused Designer Series Paper, some coordinating card stock, and the greeting/sentiment of your choice, and let’s learn to make this easy card layout using Designer Series Paper! After watching the video, make sure to scroll down to grab the supply list for the cards I made, as well as all the cutting diagram to make these yourself.
Video Tutorial | Card Layout Using Designer Series Paper
Ready? Let’s create! I hope you love this idea and use it over and over. It’s a standard layout that I go to often when I need a quick card or need to make a whole stack of cards and I don’t have a lot of time.
Measurements & Supplies
Make sure to check out the video to learn how to best cut a 6″ x 6″ piece of Designer Series Paper so that you don’t have hardly any waste.

CUTTING MEASUREMENTS:
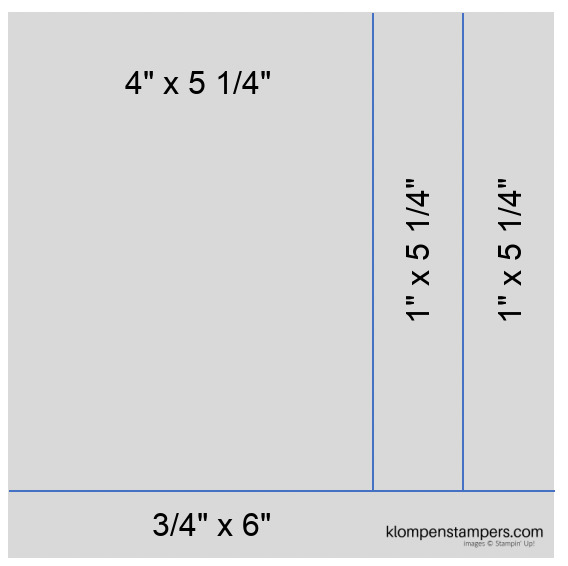
- Designer Series Paper – see chart below for the best way to cut a 6″ x 6″ piece
- You will need three pieces: 4″ x 5 1/4″, and (2) 1″ x 5 1/4″
- Coordinating Cardstock: 5 1/2″ x 5 1/2″, scored at 4 1/4″
- Inside: 4″ x 5 1/4″
Designer Series Paper Cutting Diagram
You will want to start with a 6″ x 6″ piece of Designer Series Paper (DSP.) If your paper is 12″ x 12″, simply cut it in quarters to get the 6″ x 6″ piece.
Start by cutting off the 3/4″ piece from the bottom, then cut the other three pieces that you will use for your card. This easy card layout using Designer Series Paper is perfect for a 6″ x 6″ piece of DSP because you will have very little waste. Or no waste, use that other scrap for a little pop on another card that you make!

Want to Make These Cards?
If you would like to make these cards using the same supplies that I used, just click the button below to get the complete supply list.
If you’d like to purchase any of the items, simply add them to your shopping cart. Don’t forget to check out the SPECIALS PAGE before shopping to see what deals and offers there currently are.
And don’t forget my host code to earn points towards a FREE STAMP SET of your choice.
February 2025 Specials & Happenings


Thank you so much for visiting my website today! I hope you enjoyed this quick and easy card making project. If you did, please leave us a comment below! If you have any questions, I would love to help you and answer them, just follow the link below to contact me. If you would like to place a Stampin’ Up! order, I would be thrilled if you selected me to be your demonstrator.
Contact Jackie | More Project Ideas | Card Tutorials | Stay Up To Date on Happenings
Browse Stampin’ Up! Catalogs | Shop Stampin’ Up! Products | Learn How to Shop at a Discount

Want more card making inspiration? Follow me on all my social channels.

Love this idea. I’m making several today💕
love this card
I’m so glad!!