

Today we are talking all about card making stamps! I have the complete guide to help you have success in your card making no matter what kind of stamps you use. Some stamps are “clear” while others are “red rubber.” Each type has its own unique things about them that you will want to know and be familiar with.
And since we are talking all about stamps, we will also talk about cleaning them, putting the labels on them, trimming or cutting them apart, and more.
At first, it can be a bit confusing and overwhelming – where to start, what do I do with then, and now that I have purchased them, what is next? I have lots of little tips to share with you to help you be successful in your card making. I hope you will join me and learn from my complete guide to different types of stamps! I have a ton of tips and “hacks” for you today!
Hi – I’m so glad you found this page and want to learn about stamps for card making! As you can see this post is from a little while ago. All the information is still accurate, however, we have an updated guide to teach you all about stamps that can be found HERE in our Card Making 101, Learn The Basics Of Card Making Series.
Complete Guide to Card Making Stamps
We are talking about Photopolymer, Cling Mount, Clear Mount, trimming, cleaning….and more! I hope you find this video helpful and that you learn a thing or 2!
The video was jam packed full of tips and good things that every card maker needs to know in regards to stamps. I hope it was helpful and that you learned lots! Now, let’s take a look at the different types of stamps that I talked about in the video.
Photopolymer Stamps
These are often called “clear” stamps and are fantastic for placement on your cards since you can see through them as you are stamping. As you can see in the photo, they do tend to stain, especially when using shades of “red.” But, as long as you clean them as you go, the stained colors do not effect your stamping.
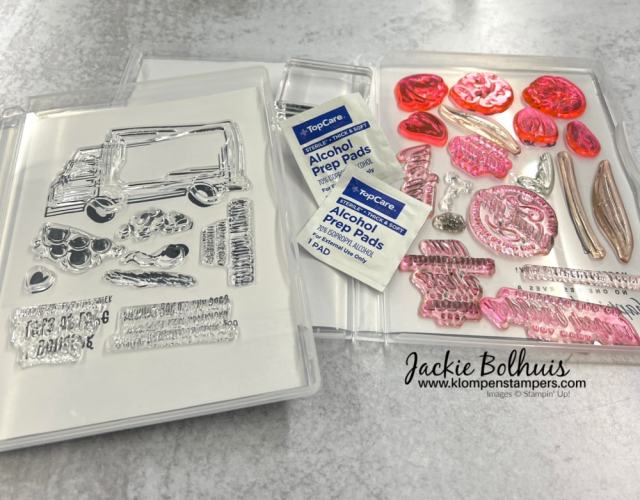
Some of the tips that I shared in the video for the Photopolymer stamps are:
- If they loose their “stick,” clean the stamps and your clear blocks with alcohol wipes
- Yes–they do stain. Especially when using “red” and “purple” toned inks
- With the new style, remove the stamps from the plastic they are on and stick right to your case. You can now see the image on the case liner. This helps you make sure you don’t loose any and always have the complete set of stamps.
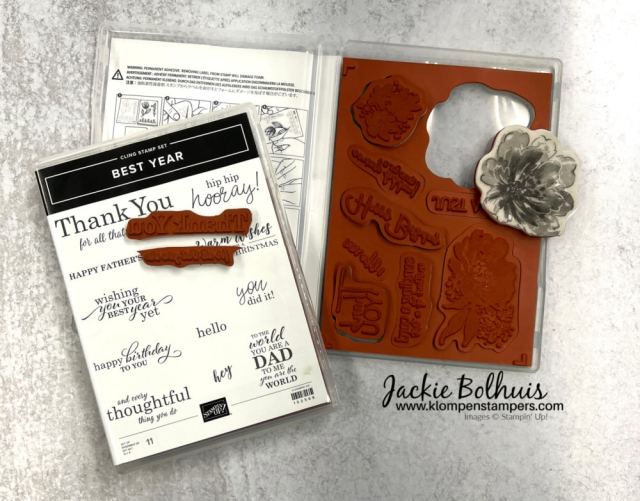
Cling Mount Stamps
These are the “red rubber” card making stamps that Stampin’ Up! carries. They call them “cling mount” because of the label you put on them.
I had a few fun hacks to share in the video, so make sure to check it out!
- How to put the cling labels on
- Is it hard to get your stamp off the block?
- What if your stamp doesn’t “take” the ink well?
- Tips for trimming the rubber if needed
I also talked briefly in the video about the old style “red rubber” card making stamps that were called CLEAR MOUNT and gave some tips for how to make them stick better to your clear blocks.
Yes – I Cut Some of My Stamps Apart
Sometimes I actually cut my card making stamps that are meant to be one, apart to make 2 (or more) stamps. If you do this, and you like to have your labels on your stamps, make sure to apply them before cutting apart. Why would you do this?
- Divide up some of the “words” on a stamp (like the stamp shown below)
- Divide up the images, like the Butterfly Brilliance stamp. It has 6 butterfly images on 1 stamp but if you cut it apart, you have 6 different “stamps” each with just 1 butterfly
Make sure to check out the video where I show you how I did this and how to put them back together as one if you want to use it as it was originally designed.

How to Clean Your Stamps
There are many different ways to clean, so find what works the best for you. Depending on the type of ink you use, you may need to use a special cleaner. In the video I talk about all the different cleaning options, products and special cleaners you may need.
And, make sure to watch to see my 20 year old method of cleaning! (and please don’t judge me!)

Essential Related Products
Below you will see all the essential products that go along with “stamps” that I talked about in the video. Yes, picking your stamps is the fun part, but you need these essentials to be able to use them. Make sure to watch the video for more information about all these products.

Learn More About the Basics of Card Making
Here are a few more posts that will help you learn all about card making, what you need, and how to get started.


April 2026 Specials & Happenings


Thank you so much for visiting my website today! I hope you enjoyed this quick and easy card making project. If you did, please leave us a comment below! If you have any questions, I would love to help you and answer them, just follow the link below to contact me. If you would like to place a Stampin’ Up! order, I would be thrilled if you selected me to be your demonstrator.
Contact Jackie | More Project Ideas | Card Tutorials | Stay Up To Date on Happenings
Browse Stampin’ Up! Catalogs | Shop Stampin’ Up! Products | Learn How to Shop at a Discount

Want more card making inspiration? Follow me on all my social channels.


Great information. My favorite tip was using the cling mount sheets!
I’m glad that was helpful for you, Pat!
Reviews are always good.
Yes they are! And you never know when you’ll pick up a new tip!
Great information and very timely for me as my stamps need a little TLC— which means I’m using them a lot.😊
That’s a great thing to hear, Susan!
Great info & review is so helpful. Like the tip of cleaning with alcohol wipe.
I’m glad that tip was helpful to you!
EXCELLENT VIDEO!!! I always learn new tips from your videos. Thank you so, so much.
Thanks for watching!
Good video and tips
Glad you enjoyed it!
Loved all the tips. I’m a SU demonstrator and like learning new tips. Thanks Jackie
You’re welcome!
I have some of the older style stamps. I also have tried the strips to put on the stamps to make them sticky. The problem I find is that the strips stick to the blocks and come off of the stamp. This still does not work.
Tana, You just have to lift a corner of a stamp and kinda ‘peel’ it back rather than trying to lift it straight off the block. If you try to lift the whole stamp you will have the issue you describe. Also, don’t leave the stamp on the block too long (pull it off the block when you are done with your stamping session–don’t let it sit on there over night). Hope this helps!
My favorite tip was about the cling adhesive but I see above from Tana that it doesn’t always work – the adhesive sticks to the block. Oh my….
It does work! You just have to lift a corner of a stamp and kinda ‘peel’ it back rather than trying to lift it straight off the block.
That is what i was hoping to find out. I do try to lift carefully. Sometimes I can not even get the tape to come off the block without using a sharp knife to lift a corner of the tape. I have put all of these stamps aside hoping someone could give me a suggestion.
I really don’t know–that’s not typical at all. I would try calling Stampin’ Up! and request a replacement.